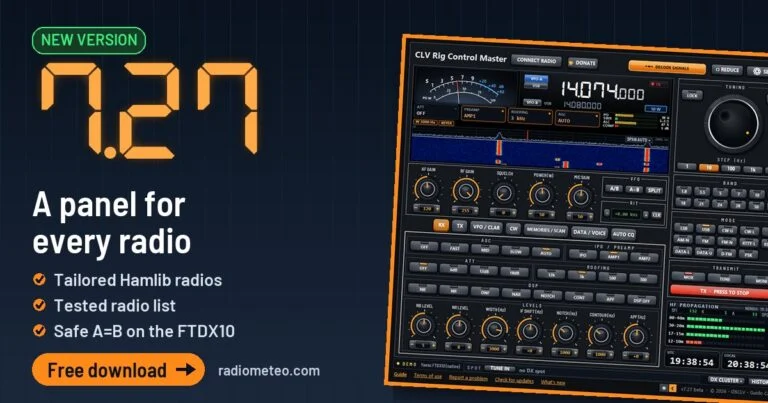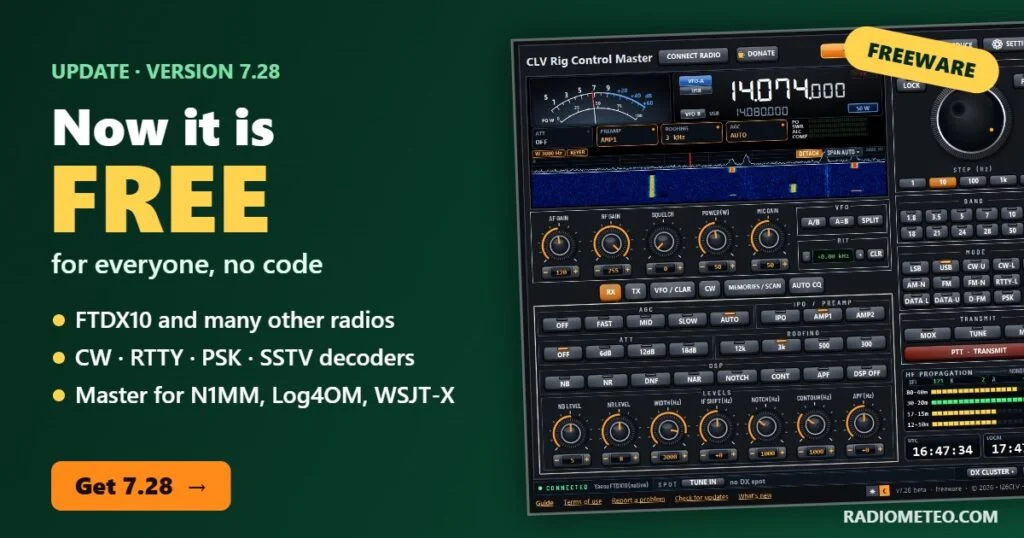
November 2026 update: version 7.28 is out and CLV Rig Control Master is now freeware, free for everyone. All functions, decoder included, with no trial period and no activation code. On this page you will find the program to download, what is new and everything you need to know before using it.
For a few weeks my station has been running a tailor-made program that I am now sharing with everybody: it is called CLV Rig Control Master and it is a CAT The link that lets a computer control the radio. control program for Windows. CAT stands for Computer Aided transceiver A radio that can both receive and transmit.: it is the «wire» the computer uses to read and command the radio (frequency The “channel” a station transmits on., mode, transmit and everything else). CLV Rig Control Master is native for the Yaesu FTDX10, but it connects to every rig supported by Hamlib: Icom, Kenwood, Yaesu, Elecraft, Xiegu and many more.
Today it is more than a panel: it has a decoder for CW Morse code sent by radio., RTTY Radioteletype: text messages by radio with a distinctive sound., PSK, NAVTEX, SSTV A way of sending pictures by radio. and weather charts, DX A contact with a very distant station. alerts and automatic transmissions for contests. And it has an ace up its sleeve: it acts as the «master»: it is the only one talking to the radio and it lends it to all your programs, open together and with no conflicts: N1MM, Log4OM, WSJT-X, JTDX, fldigi and the others. You only need to set them up once.
November 2026 update: version 7.28 is out and CLV Rig Control Master is now freeware, free for everyone. All functions, decoder included, with no trial period and no activation code.
 RadioFTDX10 or Hamlib rig
 COM portone CAT port only
 CLV Rig Control Masterthe master
 N1MM, Log4OM, WSJT-Xall together
⬇️ Download CLV Rig Control Master 7.28 beta
Windows 10 and 11 · zip file · free (freeware): all functions, no trial and no activation code
Open the zip and run CLVRigControl_v7.28_Setup.exe. Had an earlier version? Install over it, or press UPDATE NOW in the program: your settings are kept and the activation code is no longer needed. If Windows shows «Windows protected your PC», click More info → Run anyway: it happens with every new program Microsoft does not know yet. The guide is also inside the program: Guide link at the bottom of the window.
♥ A special thank you to everyone who donated
To everyone who supported CLV Rig Control Master with a donation in these months: thank you from the heart.
You believed in the program when it had only just been born. Your donations covered part of the costs (the website, the servers, the development tools) and gave me the push to keep going.
The software is in continuous development: version after version, new features and fixes arrive, for everyone.
If CLV Rig Control Master is free for everyone today, it is also thanks to you. Nothing changes for you: the program stays complete, and the old activation code is no longer needed, just update.
CLV Rig Control Master is now free for everyone
From version 7.28 the program is freeware: you download it, install it and use it without paying, on as many computers as you like and with no time limit. All functions, decoder included, work from the start.
• No more trial period and no more activation code.
• If you had an earlier version, update: your settings are kept and the code is no longer needed.
• No difference between those who donate and those who do not: the program is identical for everyone.
Free for everyone: why I chose it
CLV Rig Control Master was born for my own station, out of passion and in my spare time. With the timed trial and the activation codes I was spending more hours handling licences, e-mails and changed computers than improving the program. And those who wanted to try it calmly on their own radio had their days counted.
I preferred a simpler way, more in the ham spirit: the program belongs to everyone, complete, with no strings attached. Those who find it useful and want to help can do it in two ways: by reporting problems or with a free donation. Neither is compulsory.
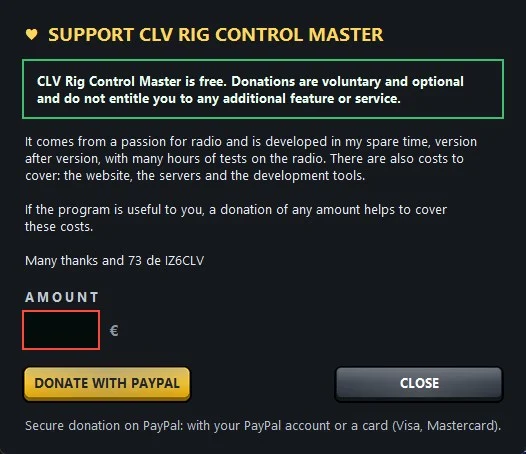
♥ The donation is free and optional
In the program there is the ♥ DONATE key: it opens PayPal and you choose the amount. It is a way to support the costs of the project (the website, the servers, the development tools): it is not the price of the program.
• It is not compulsory and you will never be asked for it to use a function.
• It does not unlock anything: those who donate have the same program as those who do not.
• It gives no right to support, updates, warranties or adaptations to a particular radio.
• After the donation the DONATE key disappears from the program by itself. To recognise the donation the program sends PayPal a code created at random, with no name or callsign.
• If you made a mistake in the donation, write to info@radiometeo.com.
Reports: the best way to help
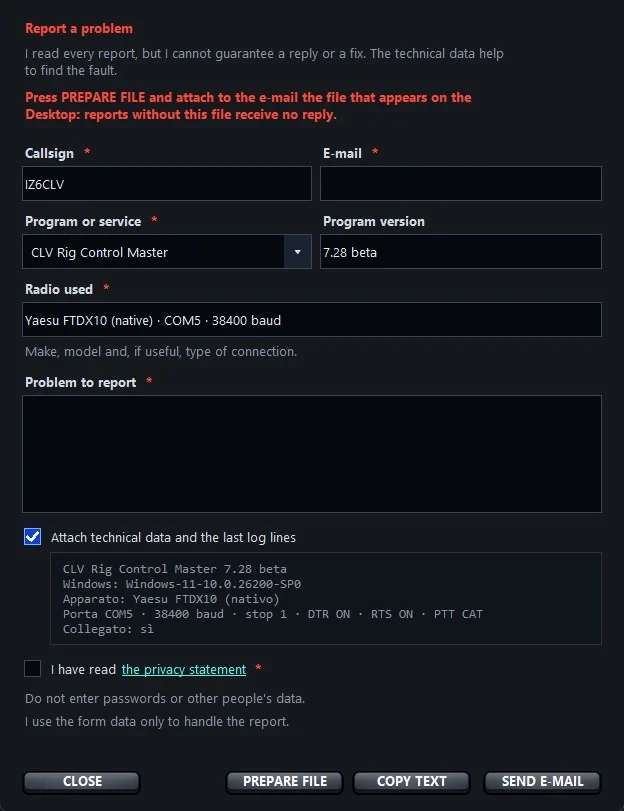
I own a single radio, a Yaesu FTDX10. I know the other radios only from the manuals and the simulators: if something does not work with yours, the only way I have to know is your report. Many fixes in this version were born that way.
At the bottom of the program window press Report a problem and then PREPARE FILE: the program creates on the Desktop a zip file with the technical data (no passwords). Attach it and write:
• the exact model of the radio and how it is connected (USB cable or interface);
• which key you pressed, what you expected and what happened;
• if you can, a photo of the screen.
I read every report, but this is work done in my spare time: I cannot promise an answer to each one, nor timing, nor a fix for every single radio. There is no support service, not even for those who donated. Thanks to the beta testers IK2JBY Mauro, IK6HQL Mario and IU7VNL Marco, who test the program with their radios.
What you need to know before using it
• It is a beta version: it may contain errors, and functions may change from one version to the next.
• It is provided «as is», with no warranty of operation or of compatibility with a particular radio or program.
• The program can put the radio into transmit. You are the operator: you are responsible for your transmissions, for complying with your licence and for keeping the radio under control while it transmits.
• Before changing the radio menu from the program, save a copy of the settings (the program asks for confirmation before writing).
• I accept no liability for damage to radios, antennas, computers or data arising from the use of the program, to the extent permitted by law.
• Privacy: the program does not send anyone your radio data, your log or your settings. From the website it only downloads the information it shows you (updates, DX A contact with a very distant station. cluster, propagation The way radio waves travel through the air.).
• You may copy it and pass it on for free, only with the original installer; it may not be sold or modified.
• Independent program: it is not affiliated with or endorsed by Yaesu or any other manufacturer.
The full terms of use can be read during installation and, at any time, from the Terms of use link at the bottom of the program window.
What CLV Rig Control Master is
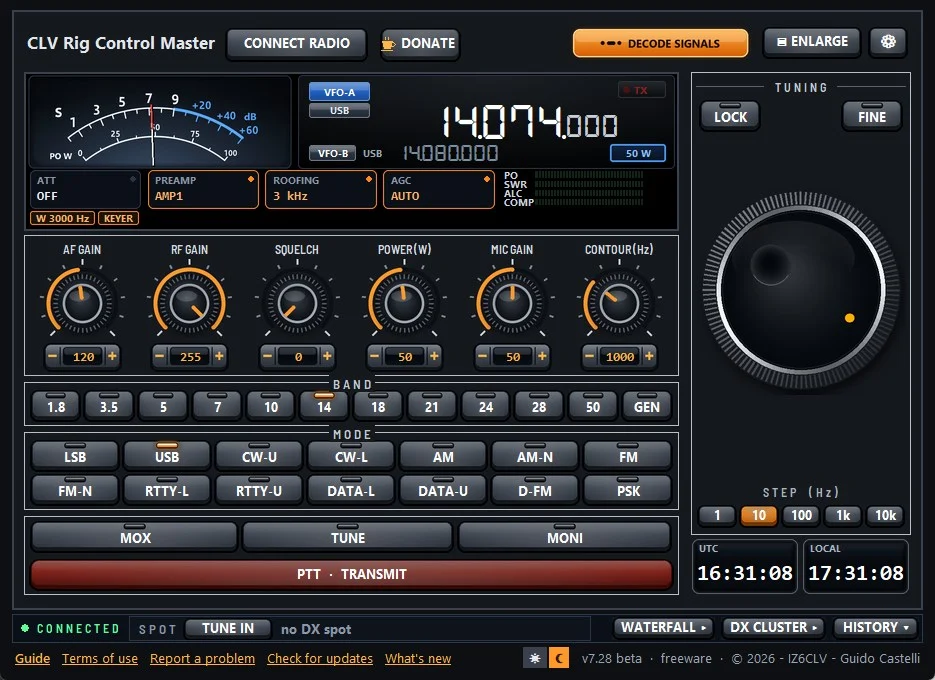
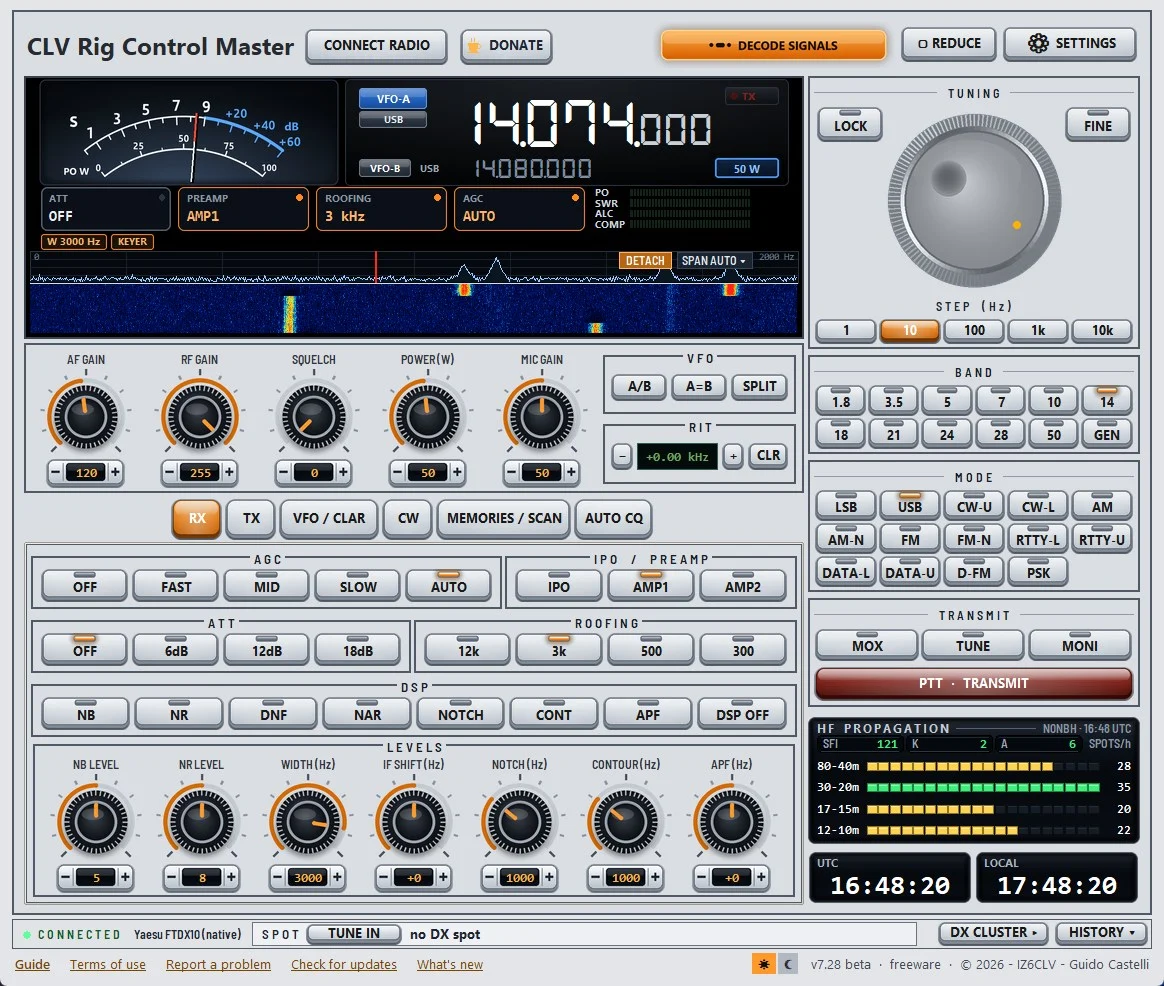
It is the radio’s control panel, on the PC screen. Open it, press CONNECT RADIO and you get the big frequency The “channel” a station transmits on., the analogue meter, the waterfall A scrolling chart that shows signals as coloured stripes over time., the band A group of nearby frequencies used for the same purpose, like a lane on a motorway. and mode keys, the dial and all the front-panel controls. With the FTDX10 the panel is laid out like a transceiver A radio that can both receive and transmit., with CLV’s own original graphics, designed to sit in a corner of the screen during a contest A competition between radio amateurs to make as many contacts as possible in a set time..
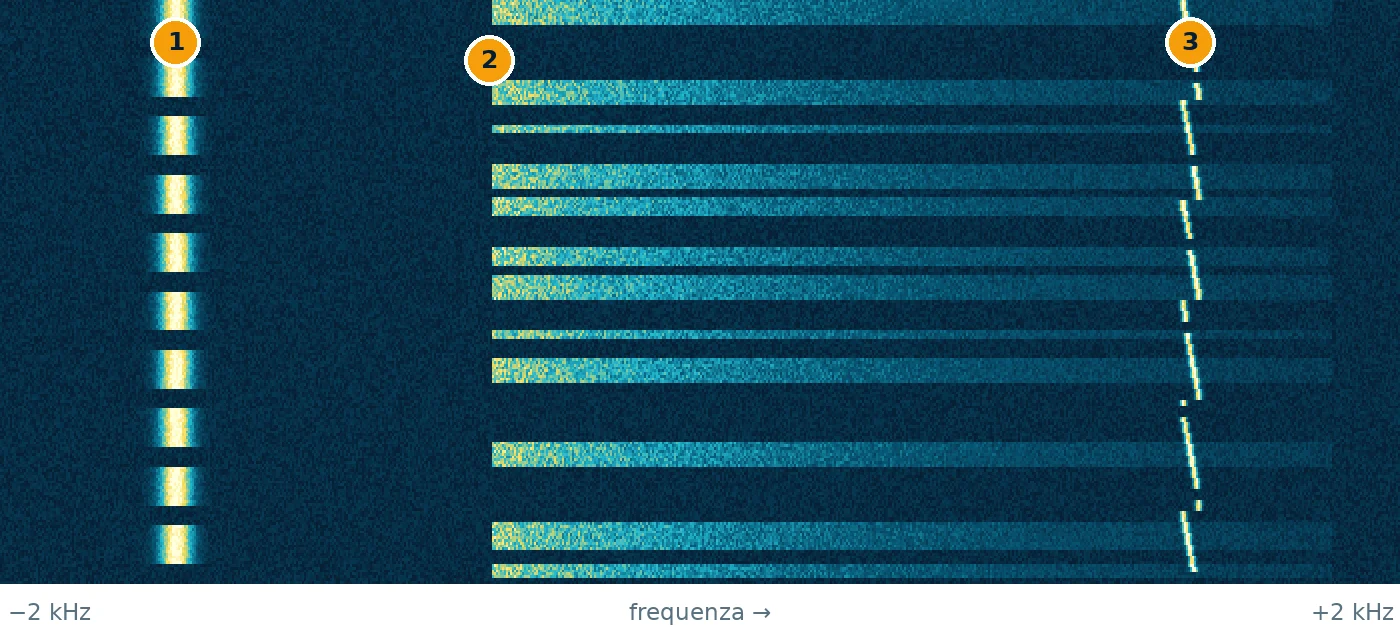
time ↓ · frequency →
- CW: a thin line that switches on and off: it is Morse code
- SSB voice: a band that lights up in bursts, following the syllables
- FT8: a tiny trace that hops between tones every 15 seconds
Teaching illustration created by RadioMeteo, not a real recording.
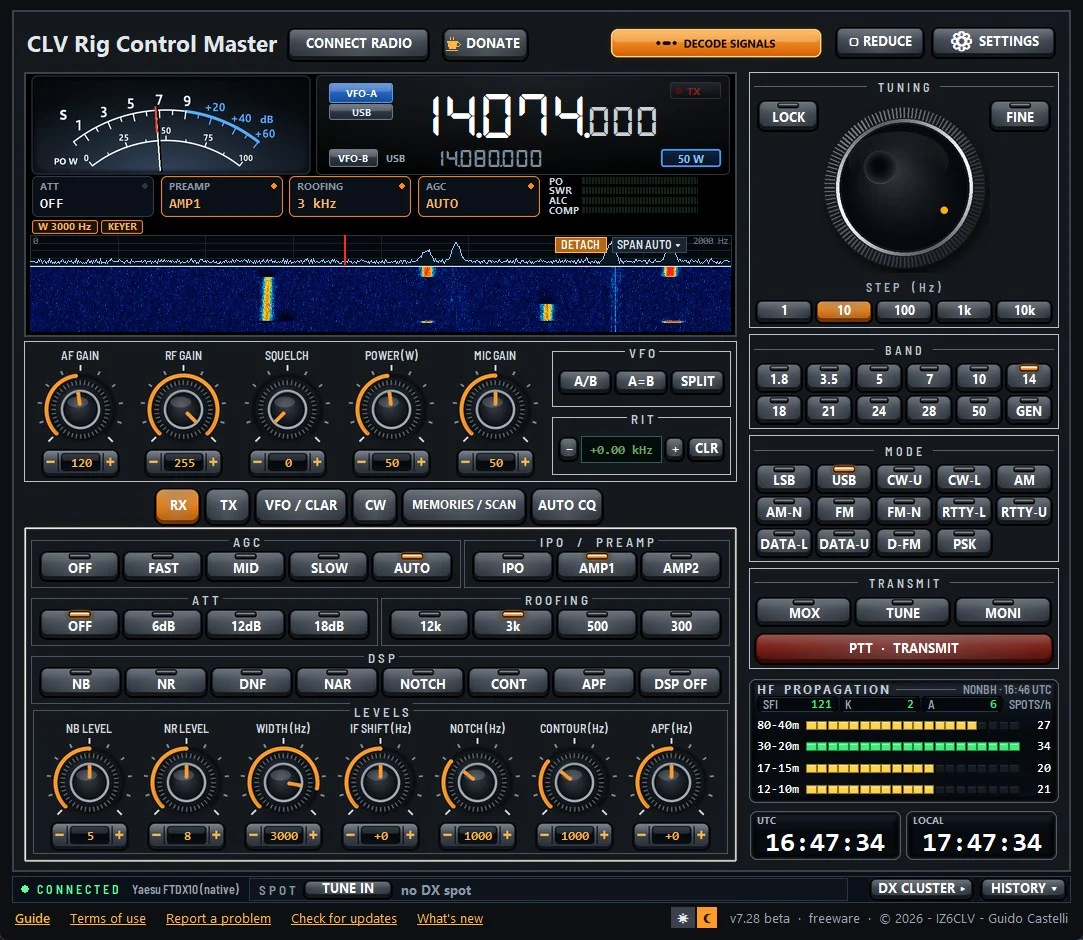
No need to install Python, Hamlib or anything else: the setup already contains everything and does not ask for administrator rights. The program is in English and Italian: it starts in the language chosen during installation and can be changed in Settings → Radio and program → Lingua / Language.
What’s new in version 7.28
7.28 is the turning-point version: CLV Rig Control Master becomes free for everyone, and quite a few new features arrive.
- Free (freeware): all functions, decoder included, with no trial and no activation code. With ♥ DONATE you can support the project, if you like: it does not unlock anything.
- waterfall A scrolling chart that shows signals as coloured stripes over time. in a separate window (DETACH / ATTACH): it can be moved and resized, and a click tunes.
- Yaesu FTDX10: knobs turned on the radio show up in CLV in about one second; smoother S-meter The radio’s indicator that shows how strong the received signal is..
- Compact view with 6 knobs; on small screens the full view adapts by itself; clicking a frequency The “channel” a station transmits on. digit selects exactly that digit.
- Decoder 1.01: new layout (F1–F8 on one row); RTTY Radioteletype: text messages by radio with a distinctive sound. without random letters on noise; WEFAX in AUTO stable, straight and saved at the end of the chart.
- AUTOMATIC CQ with the text in the tab, PTT-TX key and RECORD VOICE; SAVE in MEMORIES / SCAN stores the frequency in a memory.
- RECORD AUDIO with its own window and the list of recordings; QSO A radio contact between two stations. LOG instant even with thousands of QSOs.
- SETTINGS: TIME ZONE for the local clock; PROFILES AND METERS with the audio and transmit profiles and the METER CHECK; RESET SETTINGS to start afresh without losing the log.
- Internet: if the DX A contact with a very distant station. cluster or the propagation The way radio waves travel through the air. data cannot connect, the HISTORY shows the real reason (certificate, firewall, network).
- Report a problem: the PREPARE FILE key puts on the Desktop the zip with the logs to attach.
- New PDF guide, 37 pages, in Italian and English.
What it does: decoder, SSTV, DX and contests
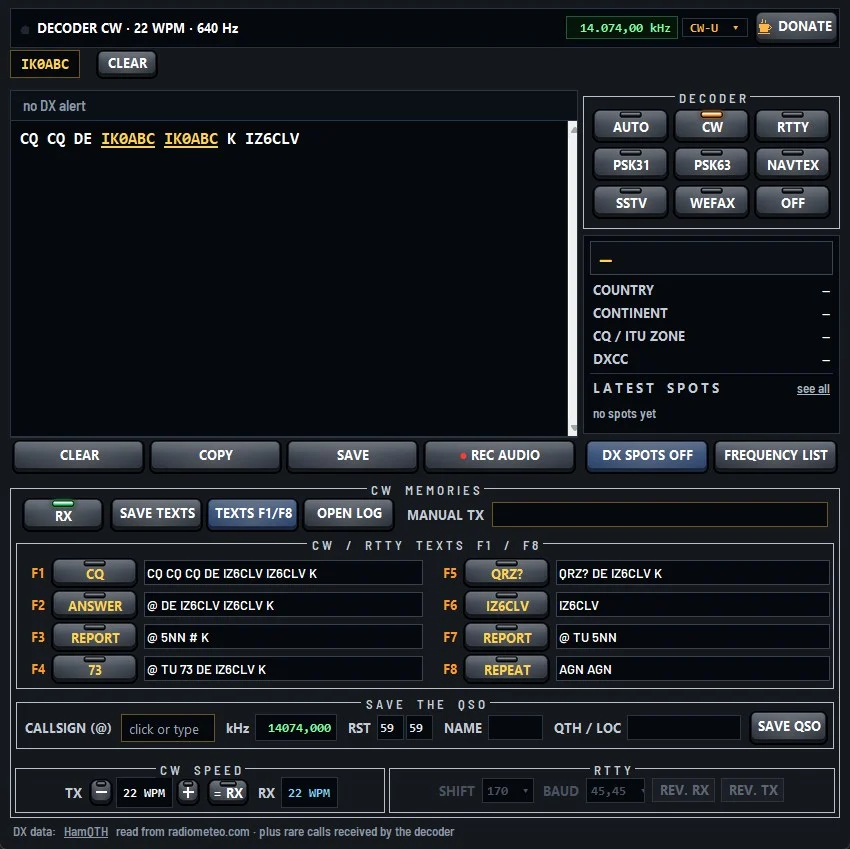
In the decoder the F1–F8 key that is transmitting has a red LED and, pressed again, stops the transmission; there is also a STOP TX key, green at rest and blinking red while transmitting. The FREE TEXT row transmits in CW Morse code sent by radio. and RTTY Radioteletype: text messages by radio with a distinctive sound. while you type: space sends the word, Enter sends the rest. And the F1–F8 rows go out as they are written at that moment, even without saving them.
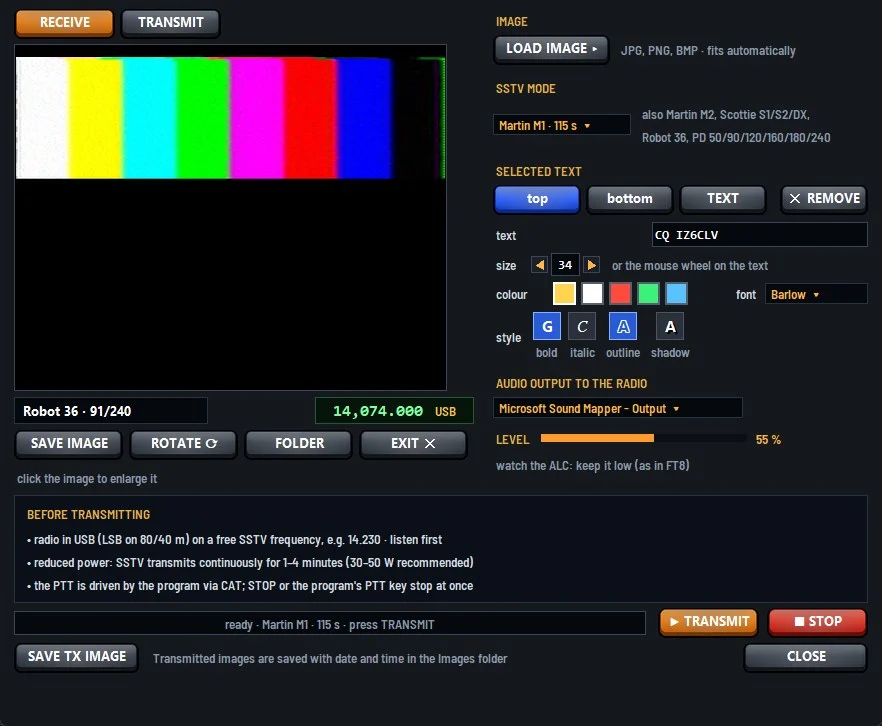
SSTV A way of sending pictures by radio.: the received picture arrives in the CLV-SSTV window, with RECEIVE and TRANSMIT tabs; one click enlarges it. In AUTO the picture starts even mid-transmission and band A group of nearby frequencies used for the same purpose, like a lane on a motorway. noise no longer opens false pictures; when you transmit the radio switches to DATA-U by itself and goes back to the previous mode at the end.
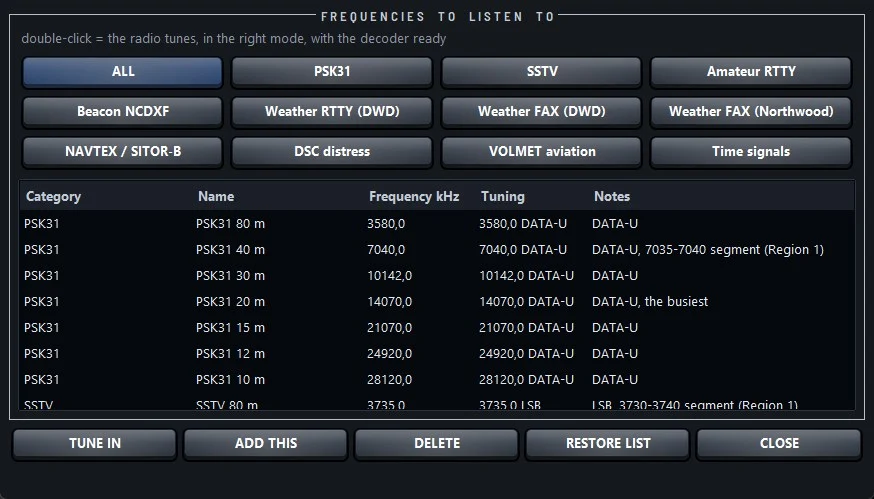
The compact view has the big dial, LOCK and FINE, six knobs and the UTC and local clocks; switching between the two views is almost instant. The FREQUENCY LIST puts SSTV and PSK31 in DATA-U and has the Amateur RTTY category. The QSO LOG has an always readable list, multiple selection to delete QSOs and the total.
CLV-SSTV transmit, REC AUDIO and DX CLUSTER
The decoder also transmits SSTV (CLV-SSTV): choose your photo, add the ready texts CQ, QSL, 73 or TNX, move them with the mouse and make them bigger, and the image goes out with PTT via CAT. The REC AUDIO key saves to WAV what the decoder hears, and with a right-click on a callsign you open it on QRZ.COM or copy it.

- CAT: the PC reads and changes frequency and mode
- PTT: the PC tells the radio when to transmit
- Audio: sound goes back and forth between PC and radio
If one works, it doesn’t mean the others do: test them one by one.
Teaching illustration created by RadioMeteo.
In CW and RTTY the CALLSIGNS row shows only confirmed callsigns: repeated, written after DE or CQ, already in the cluster or in your log. No more false callsigns from noise. The DX CLUSTER window shows all the spots of the last 30 minutes, with band and mode filters.
On the FTDX10 the MEMORY LIST reads, edits and writes the 99 channels with a backup copy, and the AUDIO / TX PROFILES save the transmit settings on the PC. The other radios get the same panel as the FTDX10 and there is a day and night theme.
The decoder: CW, RTTY, PSK, NAVTEX, SSTV and weather charts
The DECODE SIGNALS key opens the window that reads CW, RTTY, PSK31 and PSK63, NAVTEX (warnings to mariners), SSTV pictures and WEFAX weather charts from the radio’s audio. With AUTO the program recognises the type of signal by itself in about two and a half seconds and re-reads the audio already received: the start of the transmission is not lost. Received callsigns can be clicked and go into the messages to transmit; country, continent and zones are shown next to them.
DX: WANTED and NEW DXCC
The callsigns of the 100 most wanted entities in the world (Club Log «Most Wanted» list) are highlighted with their position, and spots also arrive from the RadioMeteo DX cluster, checked every minute. With Log4OM the program reads your log by itself (read-only) and warns you about the countries you have not worked yet; with other programs pick the ADIF file with LOAD LOG. The radio never moves by itself: it goes to the spot only when you press TUNE IN, and BACK puts everything back as it was.
Automatic transmissions and contests
Memories are sent with a click or with keys F1–F8; @ becomes the other station’s callsign and # the contest serial number. The key that is transmitting has a red LED: pressed again, or with STOP TX, the transmission stops. The FREE TEXT row transmits while you type. The REPEAT tab repeats a CW, RTTY or voice message N times, with the pause you choose. On the FTDX10 the program itself sends CW and RTTY through the radio’s «Standard COM Port», which it finds by itself: that is why STOP, Esc or the microphone PTT stop the transmission at once.
Frequencies to listen to
The FREQUENCY LIST collects useful stations to listen to and decode: NAVTEX, German weather service DWD in RTTY and fax, Northwood charts, VOLMET aviation weather, time signals, NCDXF beacons, amateur SSTV, PSK31 and RTTY frequencies. A double-click brings the radio to the frequency in the right mode, with the decoder ready.
TEST CONNECTION and the PDF guide
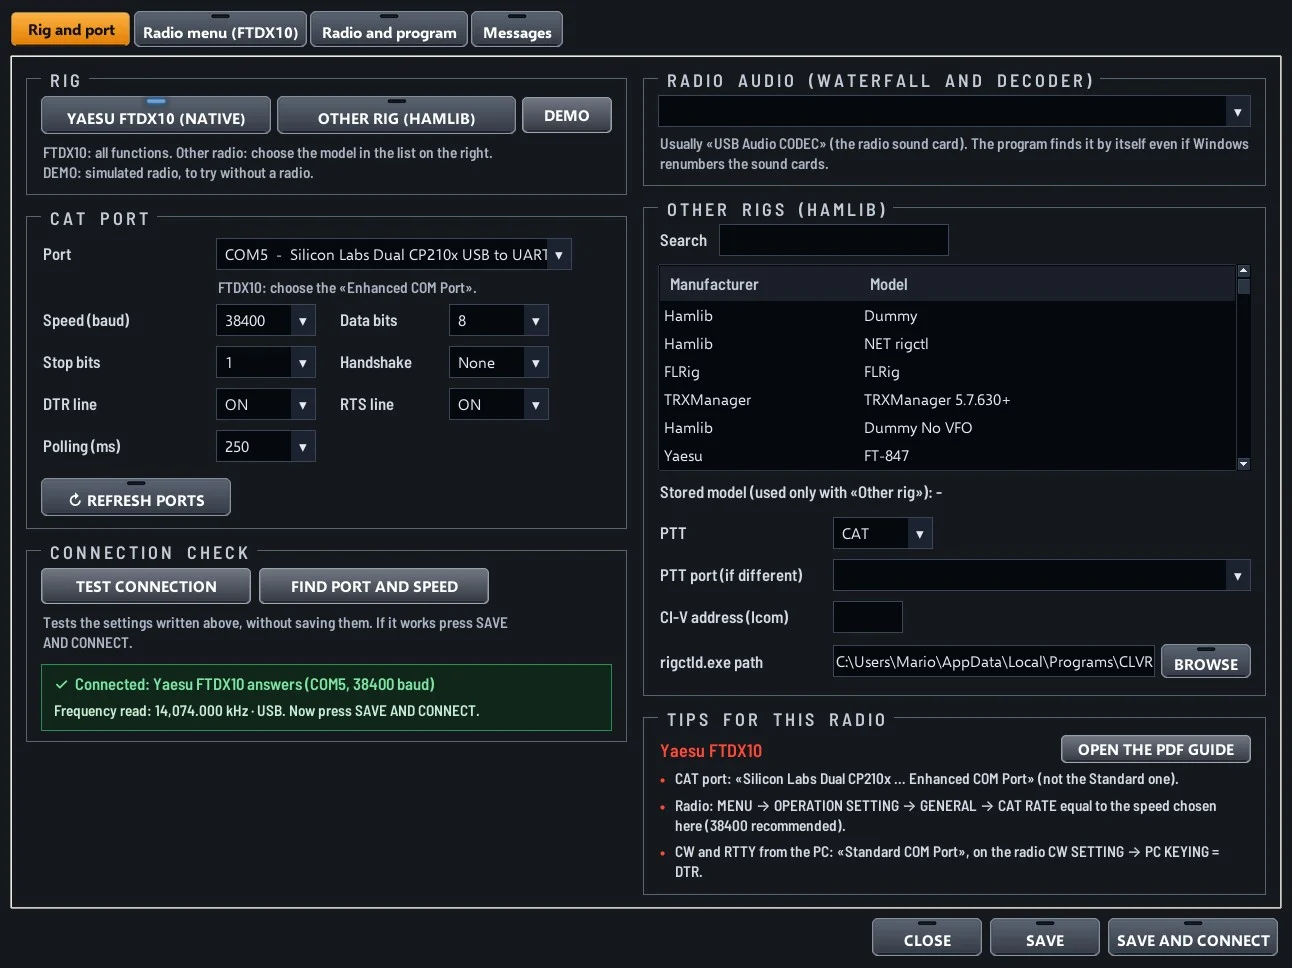
Before saving the settings press TEST CONNECTION: the program asks the radio for frequency and mode and, if something is wrong, explains what to check. FIND PORT AND SPEED tries every combination by itself and finds the right one. Next to it are the tips for your radio and the button that opens the PDF guide at the right page.
Other handy features
- Band memory: going back to a band you find the frequency and mode of last time.
- LOCK also locks the program’s dial and fine tuning.
- RIT: + and − switch RX CLAR on at the radio by themselves; CLR clears it and switches it off.
- Faster controls: the program polls the radio in small groups and gives your keys priority.
- QSO LOG with every QSO sent to Log4OM.
- Your callsign in Settings: used by the CW, RTTY and DATA messages.
- Reduced view for small screens and windows that fit every screen, from laptops to wide monitors.
- Day and night theme for all the windows, decoder included.
Thanks to the beta testers
Special thanks to the beta testers IK2JBY Mauro, IK6HQL Mario and IU7VNL Marco, who test the program with their radios. Thanks to their reports I could fix several bugs: for example the band memory and the LOCK on the program’s dial came from a report by Mauro, and the connection test for Hamlib rigs from Marco’s tests with his FTDX-101D. The connection of the other radios became stable thanks to the tests with the FT-817 and the IC-7610.
Which radios it works with
One program for every radio. With the Yaesu FTDX10 the control is native, with all the radio commands: it is the radio I use every day and on which I test every version. For the other radios (Icom, Kenwood, Elecraft, other Yaesu…) the panel is in full development: not every radio has been tested on a real rig and some functions may be missing or may not work. Below you find the honest list, radio by radio.
CLV controls the Yaesu FTDX10 natively and the other radios through the Hamlib library (313 models). I tested them in three ways: on the real radio, with the beta testers; with the Hamlib simulators; by recording the commands CLV sends for every key. Operating system: Windows 10 and 11, 64-bit (not Windows 7/8, 32-bit, macOS or Linux).
Tested on the real radio (5)
Yaesu FTDX10 (native), Yaesu FTDX-101D, Icom IC-7610, Kenwood TS-950, Yaesu FT-950.
Working with the simulator (47)
Connection, frequency and mode reading, band and mode keys, clean layout.
- Elecraft: K3, K3S, K4
- FlexRadio/ANAN: PowerSDR
- Icom: IC-2730, IC-275, IC-7000, IC-705, IC-7200, IC-7300, IC-7300MK2, IC-7610, IC-7700, IC-7850/7851, IC-905, IC-910, IC-9700, IC-R8600
- Kenwood: TM-D700, TM-D710(G), TS-590S, TS-590SG, TS-890S, TS-990S
- Ten-Tec: TT-565/566 Orion
- Xiegu: G90, X108G, X6100
- Yaesu: FT-1000D, FT-1000MP, FT-450, FT-450D, FT-710, FT-747GX, FT-817, FT-818, FT-847, FT-897, FT-897D, FT-990, FT-990 Old Rom, FT-991, FTDX-101D, FTDX-101MP, FTDX-1200, FTDX-3000, FTDX-5000
Working, with one point to check (9)
- Icom IC-7100, IC-7600, IC-9100: the mode is read only with recent radio firmware.
- Kenwood TS-2000, (tr)uSDX: the frequency is read correctly; changing frequency must be confirmed on the real radio.
- Kenwood TS-950S, TS-950SDX, Icom ID-5100: with the simulator the mode is not read (it works on the real TS-950).
- Kenwood TS-450S: mode and some keys to be checked.
Not testable yet (7)
AnyTone D578A (incomplete Hamlib data), FlexRadio SmartSDR, GUOHETEC PMR-171, Micom 2/3, QRPLabs QCX/QDX, Ten-Tec TT-538 Jupiter, Yaesu FT-736R (the radio does not report its frequency: CLV can only send it commands).
The other 250 Hamlib radios: not tested yet
There is no simulator for these: CLV is configured for the model, but correct operation is not guaranteed. From the command test:
- 76 probably work (same protocol as radios already tested), for example Yaesu FT-2000, FT-891, FTX-1, FT-920, FTDX-9000; Kenwood TS-480, TS-570, TS-850, TS-870S; Icom IC-706/MkII, IC-751, IC-765, IC-781; JRC, AOR, Ten-Tec and Rohde & Schwarz receivers.
- 50 work only in part, for example Icom IC-7410, IC-746/PRO, IC-756 PRO/II/III, IC-7800, IC-7760, IC-718; Yaesu FT-857, FT-100, FT-1000MP MARK-V; Ten-Tec Omni VII; Xiegu X5105, X6200.
- 124 with no information at all, for example Elecraft KX2, KX3, K2; FlexRadio 6xxx; Alinco; ELAD FDM-DUO; Lab599 TX-500; Kenwood and Icom handhelds; Uniden scanners; SDR programs.
Your radio does not work properly? What to send me
- In CLV press Report a problem (at the bottom of the window): the form adds the technical data by itself. Write which key you used, what you expected and what happened.
- Give the exact model and firmware, how it is connected (USB cable or interface) and the CAT settings in the radio menu.
- Attach a screenshot of CLV and the files rigctld.log and errori.log (folder %APPDATA%\PannelloCAT, type it in the File Explorer address bar).
- If you can, tell me whether the radio works with another Hamlib program (e.g. WSJT-X with the same model).
How I handle reports: I check every radio personally, one at a time, against the official CAT manual, and I send you a test version. The radio moves to the working list only after you confirm it on the real radio. This is spare-time work: if it helped you, a donation is welcome for the effort (DONATE key in the program). It is never required and does not change the help you get.
What comes in the next updates
- Tests on the real radio of the 9 «to be checked» radios, with the beta testers.
- Checking the commands of the 76 «probably work» radios against the official CAT manuals.
- New family simulators (Elecraft KX, older Icom, Kenwood handhelds).
- Hand-written profiles, from the official manual, for radios with wrong Hamlib data (e.g. AnyTone).
- A «Radio compatibility» table inside the program and in the guide.
Do you own one of these radios and want to help me test it? Write to me with «Report a problem» and become a beta tester.
All the features
- Big frequency you can type with a click, dial, steps from 1 Hz to 10 kHz and fine tuning.
- Analogue S-meter: on receive it measures the signal, on transmit the lower scale shows PO, ALC, COMP, VDD, ID or SWR.
- Spectrum and waterfall from the radio’s USB audio: click to tune the signal.
- Bands and modes, with frequency and mode memory for each band.
- With the FTDX10: receive (IPO and preamps, attenuator, AGC, roofing, NB, NR, DNF, notch, contour, APF), transmit (power, mic gain, processor, VOX, MOX, MONI), complete radio menu, CW and keyer, memories and scan, voice memories.
- Decoder CW, RTTY, PSK31/63, NAVTEX, SSTV and WEFAX, with automatic recognition and pictures saved as JPG; SSTV transmit with CLV-SSTV.
- DX: WANTED, NEW DXCC, RadioMeteo DX cluster, automatic split, latest spots.
- Contests: F1–F8 memories with red LED while transmitting, FREE TEXT, repeated messages, CW and RTTY from the PC with instant STOP.
- QSO LOG in ADIF format, sent to Log4OM.
- UTC and local clock with the locator, HF band propagation.
- Transmit safety: confirmation before transmitting and automatic PTT switch-off.
- DEMO mode to try everything without a radio.
The «master»: how I made the programs talk
Here is the problem every ham with several programs knows: the radio’s CAT port can be opened by only one program at a time. If N1MM opens it, Log4OM and WSJT-X are left out: «port in use», «rig control error», programs to close and reopen. I used to use OmniRig for Log4OM and WSJT-X, but N1MM was left out.
The solution is simple to say: CLV Rig Control Master opens the radio’s port and becomes the «master»; all the others connect to it through network ports inside the PC (address 127.0.0.1, which means «this same computer»). Inside CLV there are two small «servers»:
- a Yaesu server on port 10501, which presents itself as an FTDX10: N1MM Logger+ uses it;
- a Hamlib server on port 4533, which speaks like rigctld, Hamlib’s «switchboard»: Log4OM, WSJT-X, JTDX and fldigi use it.

All commands go to CLV, which passes them to the radio one at a time: so N1MM, Log4OM and WSJT-X stay open together and always see the same frequency. Port 4533 can be used by several programs at once: it is not a serial port, it is like a website with many visitors.
| Program | Where to set it | What to choose |
|---|---|---|
| WSJT-X | File → Settings → Radio | Rig «Hamlib NET rigctl», 127.0.0.1:4533, PTT CAT |
| Log4OM 2 | Settings → Program Configuration → CAT Interface → Hamlib | «Connect to active HAMLIB instance», port 4533 |
| N1MM Logger+ | Config → Configure Ports → Hardware | Port TCP, Radio FTDX10, 127.0.0.1:10501 |
| JTDX, JS8Call, fldigi, MSHV | Radio settings | «Hamlib NET rigctl», 127.0.0.1:4533 |
I use WSJT-X, Log4OM and N1MM every day in my station; JTDX, JS8Call, fldigi and MSHV use the same connection but have not been tested by a beta tester yet. The PDF guide shows the step-by-step setup of each program, with screenshots.
📌 Real case: In my station N1MM connected at the first try. Log4OM instead stayed OFFLINE: looking at CLV’s log I saw that, right after connecting, it asked for the VFO list with a command in a special format that the first version did not answer. Once that was fixed, it connected. WSJT-X gave «Rig control error» for a much more human reason: I had typed port 4333 instead of 4533. CLV’s log, which shows every program that connects, helped me find everything in a few minutes.
💡 Practical tip: Switch the radio on, open CLV Rig Control Master and press CONNECT RADIO; only then open N1MM, Log4OM and WSJT-X, in any order. No other program must have the radio’s port in its settings, not even OmniRig. If you open a program before CLV, no big deal: in WSJT-X press Retry, in Log4OM click the connector icon.
Updates arrive by themselves. When a new version comes out, CLV Rig Control Master shows what is new at start-up and the «UPDATE NOW» key: it downloads the new version and installs it over the old one; your settings are kept.
Coming soon
- More languages, besides English and Italian.
- CLV Rig Control Master for Linux.
- FT8 and FT4 decoder inside the program.
- Remote control of the station from another computer.
- Verified tips for more radios: if yours is missing, send me COPY DIAGNOSIS.
Summary
CLV Rig Control Master is a complete and free CAT panel for the FTDX10 that also works with the other radios, has a decoder for digital modes and weather charts, warns you about the DX you are missing and above all acts as the master: one port open, every program connected, zero conflicts. And how do you get logging, contesting and digital modes to live together on the same radio? Tell me in the comments.
CLV Rig Control Master is an independent program, not affiliated with, sponsored or endorsed by Yaesu Musen Co., Ltd. or any other manufacturer. Yaesu, FTDX10 and the other rig names mentioned are trademarks of their respective owners and only indicate which radios the program works with. The program is a beta version and is used as it is: whoever transmits is responsible for their transmissions and for complying with the rules; I take no responsibility for improper use or for damage to equipment, data or anything else. The full terms of use are shown during installation and in the program.
Further reading
RadioMeteo newsletter
News from RadioMeteo and the CLV programs by e-mail. You can unsubscribe at any time.
Protected by reCAPTCHA: Google Privacy Policy and Terms apply.